![]() Estimating Edge’s team of experienced construction professionals and software engineers have developed the industry’s smartest takeoff and estimating software solutions for competitive estimates.
Estimating Edge’s team of experienced construction professionals and software engineers have developed the industry’s smartest takeoff and estimating software solutions for competitive estimates.
Don’t just estimate faster. Estimate better.®
- /
- /
- /
Labor Analysis Properties Screen
Property Dialog Labor Analysis Screen
To start with please notice that there are two icons and two shortcut keystrokes to access Properties in The EDGE.
![]()
This icon and keystroke is used everywhere in the program to view the properties of an item, a line, a page, etc.
![]()
This icon is used on the Condition List Screen, the Item List Screen and the Group Conditions Screen to view a conditions properties. That is all this icon/keystroke can do is view condition properties nothing else.
The job Labor Analysis List screen is one of several screens in The EDGE where the Property icon and Condition Property icon can both light up. They perform the same function when used (one for item properties and the other for condition properties.
The Labor Analysis Screen:
However, there are a couple of rules which must be followed. If you want to look at the properties for an item or condition the first thing you do is to highlight the line you wish to view.
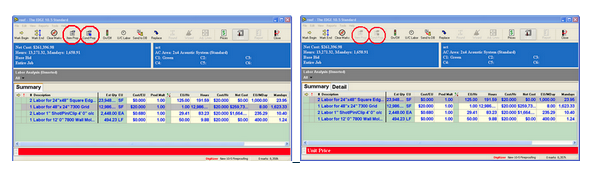
In the example to the right, the cursor is highlighting the first line on the screen. Look at the Property icons they are both grayed out which means they are unavailable.
Looking at the example to the right, the cursor has been moved to the second line. Now, both properties icon are lit up and available.
By blowing up the screen the difference lies in the # column. The # column tells you how many times this line item occurs in the estimate. If the item only occurs one time the the properties icon light up. If the item occurs more than one time the icons gray out because The EDGE does not know which occurrence of the item you want to look at.
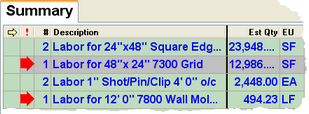
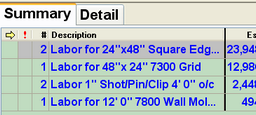
Go back for a moment and look at the graphic in the top block, then look at the graphic in the second block. In the top block the cursor is highlighting an item that appears two times in the estimate and therefore the property icons gray out. Additionally, when items have multiple occurrences a secondary tab appears next to the Summary tab. It is called the Detail tab. In the second block the highlighted item only appear one time and therefore the Detail is not needed or required.
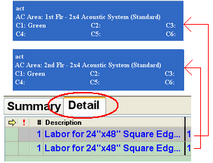
If you highlight an item with multiple occurrences and then click on the Detail tab. The Detail dialog screen will open. The screen will display one line for each occurrence of the item in the estimate. As you move your cursor up or down across the item look at the top right blue box. This field will display the name of the condition the line item is associated with.
Click the Properties icon () to view an items properties. Click the Condition Properties icon () to view a conditions properties.
Item Properties Dialog
General:
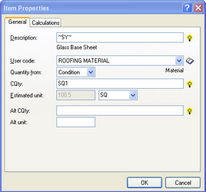
Description – A description of the item being added to the Database. May be expressed as only Tilde Codes “~”.
Comment – If your description contains Tilde (~) codes you can use this line as a description for the item. If you chose to use this line then this is the line that will appear printed on the reports. If not using tilde codes leave blank.
User Code – The EDGE uses a modified version of the CSI (Construction Specification Institute) Uniform System. The EDGE use the standardized 16 divisions.
Quantity From – Where this item is going to get its initial quantity (Condition, Entered, Costing, Hours).
CQty – Click the , it will open the CQty/Tilde Builder for the condition. From there you will select the C quantities and tildes for the item.
Estimated Unit – When estimating this item by hand, how did you do it? SF (square feet), LF (lineal Feet), EA (each), SQ (square), CY (cubic yards), SY (square yards), LY (lineal yards), BF (board feet).
Calculations:
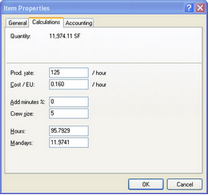
Quantity – the measured or entered quantity.
Prod Rate – This is the amount of work you can get done for a material item in a given amount of time.
Cost / EU – Allows an estimator to literally add additional minutes to a labor function or operation.
Crew Size – The total labor based on Crewdays for the estimate.
Hours – The total labor based on Manhours for the estimate.
Mandays – The total labor based on Mandays for the estimate.
Accounting:
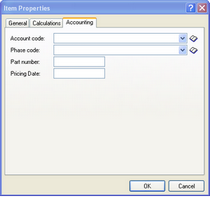
Account Code – If using account codes select from the drop down menu the account code for the item.
Phase Code – if using phase codes select from the drop down menu the phase code for the item.
Part Number – enter a part number for the item.
Pricing Date – enter a date the is entered.
Condition Properties Dialog:
Clicking the Condition Properties icon () or pressing () will open the Condition Properties dialog for the condition being quantified in the drawing screen as seen below