![]() Estimating Edge’s team of experienced construction professionals and software engineers have developed the industry’s smartest takeoff and estimating software solutions for competitive estimates.
Estimating Edge’s team of experienced construction professionals and software engineers have developed the industry’s smartest takeoff and estimating software solutions for competitive estimates.
Don’t just estimate faster. Estimate better.®
- /
- /
- /
Select Multiple Conditions
How To Select Multiple Conditions
Overview:
![]()
This feature allows you to select multiple conditions at one time instead of just the one you are currently on. The type of condition you are digitizing will determine how Select will respond, for example:
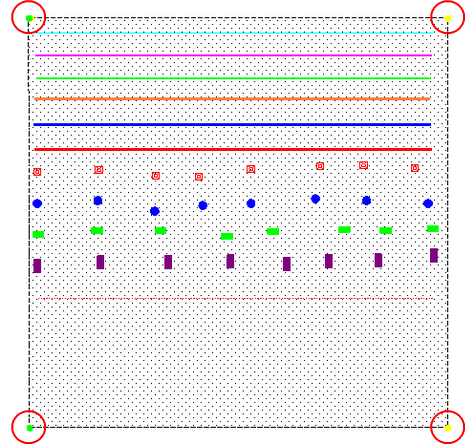
Assume your cursor is highlighting the first condition on your drawing screen, an area condition.
If you click the Select icon and then click anywhere on the perimeter of the dashed line drawn below you should get two green (start/finish) dots and two yellow (intermediary) dots, one in each corner of the perimeter.
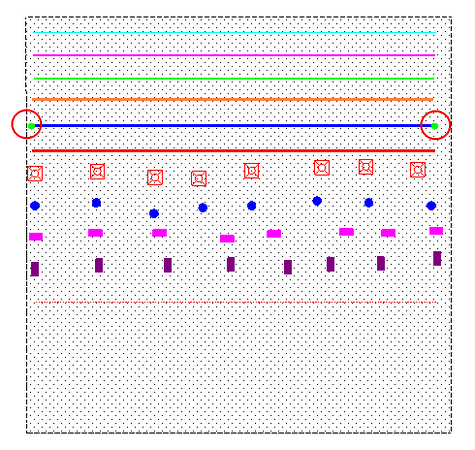
If you move your cursor down to say the sixth condition, click the Selecticon and the click on the blue line on the drawing screen you should have a screen similar to the one below.
As you can see you can select one condition at a time. However, drywall and painting estimators sometimes need to select multiple conditions for stocking purposes. This is where the Select Multiple Conditions feature comes in handy.
To use click the Selecticon, move the cursor arrow to where you want to begin selecting multiple conditions, press and hold the ALT button. Now draw a box or rectangle around the conditions you want to select.
NOTE:
Always start your selection outside the original area. If you try to select from inside the original area all you will wind up doing is shifting the first drawn condition on this page to somewhere it does not belong.
For example to select multiple conditions, there are 12 conditions used in the above drawing, to select items from the middle of conditions 9, 10 , 11 we did the following:
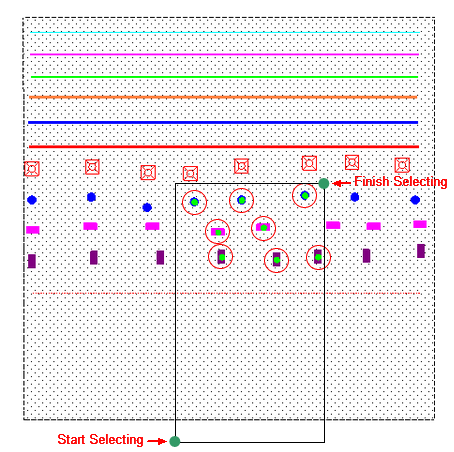
Clicked on the Select arrow.
2.Moved the cursor arrow below and outside Condition #1’s perimeter. Then pressed and held the Alt key down.
3.Drew a diagonal upwards and to the right and stopped at the point indicated.
4.When we let go of the mouse and Alt key the items in Conditions 9, 10 and 11 that are within the drawn rectangle all lit up as indicated by the red circles around the green dots. Now you can run a Standard Report on these selected Shapes including stocking and drawing reports.
Additional Features and Functions:
·When making your selection using the select multiple conditions tool, if items are selected by mistake, and an area condition is involved, move that area condition to the last active condition on the Condition list.
Click back into the drawing screen and re-select the multiple conditions as described above. If you need to de-select a shape hold down the ALT + CTRL keys and click on that shape. This will release it from the select mode.
·This same concept also works if you want to add additional shapes to your original multiple selection. If there is a shape that did not get selected with your original multiple condition select, but needs to be, you can again hold down the ALT + CTRL keys and single click on the additional shape that you wish to add, all other shapes remain selected and the new shape is added to those.
·If you are attempting to select multiple conditions that are drawn inside of an area, but do not wish to include the area in the selection, begin the select process as described in the above diagram making sure that you do not include a corner of the area shape in the select process. As soon as a corner of the area shape is included in the select box the entire area shape will also be included with the other entrapped shapes. Note: You cannot select a partial area shape. Its either the whole area shape or not at all.