![]() Estimating Edge’s team of experienced construction professionals and software engineers have developed the industry’s smartest takeoff and estimating software solutions for competitive estimates.
Estimating Edge’s team of experienced construction professionals and software engineers have developed the industry’s smartest takeoff and estimating software solutions for competitive estimates.
Don’t just estimate faster. Estimate better.®
- /
- /
- /
Set Up Smart Labor
Set Up Smart Labor
Overview:
Smart Labor is a feature of The EDGE that analyzes selected tasks, production rates, degrees of difficulty, number of tasks, etc and adjusts the time that will be needed to complete the task. Therefore,your labor is automatically being adjusted as you add more and more.
For example:
·A roof on a self-storage building may have one or two penetrations through the roof, the sheet metal crew comes in and does its work. The amount of time the insulation and roofing crews will take to do their portion of the work will not be hindered by the sheet metal mechanics.
·Now lets take a roof on say a research hospital, where there could be hundreds of roof penetrations, some of which may be close to each other. The sheet metal crew goes to work and their production rate is the same as it was on the self-storage roof. However, the production rate for the insulation and roofing crews goes down each and every time they bump into one of these penetrations.
When Smart Labor is set up in The EDGE, the program looks at the number of penetrations and as they increase The EDGE begins to add additional minutes to the time it is going take the insulation and roofing crews hence the term Smart Labor.
Setting Up Smart Labor:
The easiest way to set up Smart Labor is to create a dummy job that you will use only for setting up the smart labor templates. Insert at least one page and set a scale. Bring in a condition or conditions from your group database, which is set up with the labors that you want to add to Smart Labor. Click Drawing | Digitize some quantities for this condition so that it turns on the labor items.
Now, go to your Labor Adjustments screen and highlight ONE of the labors that you want to use to set up smart labor. Click on the Replace button to take you to that item in the Item Database.
NOTE:
Prior to selecting a labor item make sure it a 1 in the #, if it does not you will have to click the DETAIL tab at the top of the columns, when the Detail window opens you will be able to select a single occurrence of the labor item.
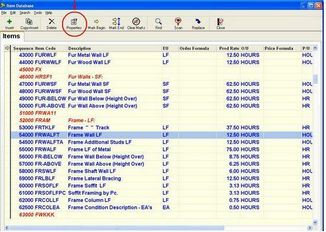
Now with the item highlighted click Properties of the item that you are sitting on in the item database. Once you are in the item properties dialogue box, you need to click the Template tab at the top of the box.
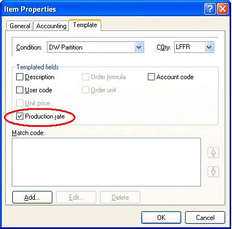
The next step is to set a match code with the criteria that you want to build the Smart Labor. For example: You may want to say that when the length of the stud changes from 10’ to 15’ long, you need a different framing production rate. In this case then the “match code” we speak of should have something to do with a studs’ length.
To setup a match code in order to do this, click the Add button.
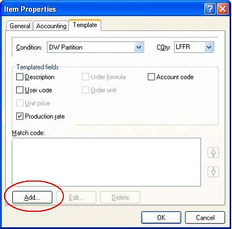
When you click the Add button, the Match Code Builder dialogue box opens. The next step is to set up Match Codes which tell the smart labor what to trigger off of. Based on the example above (Step 7); you must choose the correct Tilde code from the drop down list for the Stud Cut Length field. This means that anytime the stud cut length changes, that the system will allow you to save a new production rate, for that length.
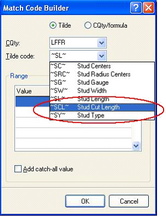
·There are two radio buttons at the top of the window. The Left or Tilde radio button should be selected.
·Every line item in an estimate gets its quantities via the CQty (C Quantity) field. The CQty for this item is LFFR or Lineal Feet Framing. It is strongly suggested that you DO NOT start arbitrarily changing CQty’s.
·The last field is The Tilde Code field. Click the drop down arrow “V”. This will display a drop down list of available Tilde codes, you are looking for one associated with stud length. The logical choice is ~SCL~ Stud Cut Length.
·Select ~SCL~.
After selecting the correct tilde code(s), you may want to set up a range, which will allow you to set a span of lengths for the cut-off points of where the production rates will change.
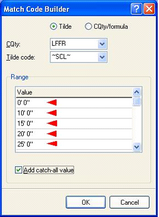
For example: you may want to say that from 0’ to 10’ long, you will have production rate of 15 LF per hour, but from 10’ to 15’ long, your production rate would drop to 10 LF per hour, and so on.
To set the range, you need to input these lengths into the Range Value box. Click in the first blank line and type the number that you want, then click the down arrow and type the next number, and continue as many times as necessary. Follow the example below. If you check the Add catch-all value, the system will automatically set one more range, which will start with the highest number that you input and end with infinity.
Once you have your range set you can click OK, and then if you need to add other criteria (such as changing labor based on stud gauge), you can click Add again and choose a new tilde code, and set up the new range. You can add as many criteria as you need to. Once you have all of your criteria set up, you can click OK to the item properties.
You can now click on the Replace button again, to pull the newly templated item into the job.
Once the item is back in the job you can begin to save your smart labor production rates to the database. To do this, you can take the labor item out to the Labor pricing screen and set the production rate which will allow you to save it to the database, or you can set it on the labor screen, then click on Edit and Send to database, and save the production rate this way.
