![]() Estimating Edge’s team of experienced construction professionals and software engineers have developed the industry’s smartest takeoff and estimating software solutions for competitive estimates.
Estimating Edge’s team of experienced construction professionals and software engineers have developed the industry’s smartest takeoff and estimating software solutions for competitive estimates.
Don’t just estimate faster. Estimate better.®
- /
- /
- /
Templates
Templates
Overview:
A template item allows a single item to be used in place of many similar items. For example:
·One metal stud template item can be used for any metal stud available. This one item replaces nearly 2ooo metal stud items.
·One roll roofing template item can be used for any roll of roofing material. This item replaces hundreds of different type of roll roofing material.
·One acoustical tile template item replaces thousands of different types of acoustical tile.
·The same applies to painters and paint.
Template items are only found in The EDGE Item Database as a sub Database. Lines in the Item Database are color coded, if you can remember the code you can easily recognize what an item is for example:
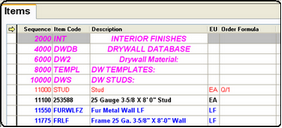
In the example above the PURPLE or FUCHSIA colored lines are either labels or used for blank spaces. The RED line are the Templated items. BLACK lines are material item lines. BLUE lines always refer to labor lines.
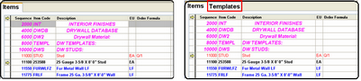
Normally there is only one tab at the top of the screen titled Items however, whenever your cursor lands on a templated item a second tab appears at the top titled Templates. If you highlight a templated item and click on the Templates tab, the screen for that item will appear.
What is a Template Item?
In some cases, the condition can control the description of an item easier than making you swap that item out with another. Examples of this in the Drywall database are board, studs, and bead. Examples in the Roofing database are insulation fasteners, insulation, and single ply membrane. In the Acoustical database main tees, long and short cross tees. When we do this, you enter information such as the stud gauge in the condition dialog, and it automatically changes the item’s description. In some cases, it even changes the formula or another field. We call this item a template, since the one item actually represents many similar items. (You may see these items referred to as template items, item templates, or just templates. In any case, we mean the same thing).
The most common use of template items is to be able to price similar items differently as the size (thickness, width etc.) changes.
Basic Setup Steps
Note:
Templated items are typically specific to a trade or industry. Trying to find an example that everyone is familiar with is not easy but we think we have found an item that everyone is familiar with a WOOD stud. We will set up a wood stud as a template item.
The basic steps to set up an item as a template are, in the Item database, Click Insert (), a blank Item Properties dialog opens.
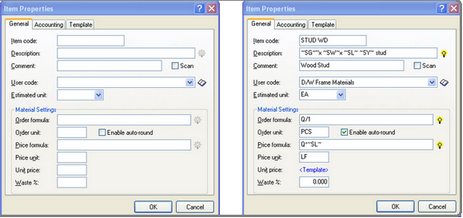
GENERAL TAB
Item Code – A user created abbreviation or code for the new item, it must be unique, there can be no duplicates. In this case STUD WD was used.
Description – A user or manufacturer created description of the new item. For items such as STUD you want to take as much advantage as you can of tilde fields in the description.
The lines below show how the tilde codes are used in a description and what they mean.
Description – ~SG~ GA ~SW~ x ~SL~ ~SY~ STUD
What it means:
~SG~ = Stud Gauge
~SW~= Stud Width
~SL~ = Stud Length
~SY~ = Stud Type
* ~SG~ is typically used for metal stud gauge but this is a wood stud all we did was substitute the wood stud thickness.
Comment – The comment field is used to provide you with an English description of the item. This helps the reader understand descriptions that are all in tilde codes.
User Code – This field displays the user code the item has been assigned to. You can select the user code by clicking on the down arrow to open a list of available user codes. You can select, add, modify and delete user codes from this list by clicking on the database icon .
Estimated Unit – How the item will be estimated. Clicking on the inverted arrow will revel the choices available. Clicking on one of the choices will select it.
Order Formulas – A mathematical formula used to convert estimated quantities into order quantities. An order formula follows standard mathematical hierarchy:
(1) Parentheses, (2) Multiply/Divide, (3) Addition/Subtraction
The formula accepts standard math symbols:
+ Add, * Multiply, / Divide, – Subtract, ( ) Parentheses.
An order formula must begin with a Q:
While a Q tells the program to report the exact order quantity.
Order Unit – How you will order the unit, i.e. rolls, pieces, bdft, squares, bundles, etc.
Enable Auto Round – If you check auto-round, any items that have been set to auto-round will automatically be rounded up in the pricing screen. If you do not want an item to be automatically rounded, you will NOT check the auto-round box on the general page of an item’s properties as seen here.
Price Formula – In some instances a second formula is required to convert from order units to price units. The same rules apply for price formula as for the order formula. The price formula is typically the opposite of the order formula.
Price Unit – How the unit will be priced. If this field is left blank the program assumes that the price unit is the same as the order unit.
Unit Price – If a price is entered here, it will always be brought in when the item is used in an estimate. It is recommended that you price only items whose prices tend to remain steady. If you are always getting quotes on the item do not price it here as it could lead to a wrong price in the estimate.
Waste % (Percent) – Adds a specific amount of waste to the item each and every time it is used in an estimate. The user determines the amount of waste for each item, waste is an optional field an need not be used. Waste may be added at the time the estimate is performed and may be changed in the estimate. Waste percent is entered as a whole number. Waste cannot be added to labor items.
ACCOUNTING TAB
Account Code – A field where you can store the account code for an item. You can select the account code by clicking on the down arrow to open a list of account codes. Or, you can select, add, modify and delete account codes from this list by clicking on the Account Code Database icon.
Phase Code – A field where you can store the phase code for an item. You may enter a phase code or you can select the phase code by clicking on the down arrow to open a list of phase codes. Or, you can select, add, modify and delete phase codes from this list by clicking on the Phase Code Database icon .
Part Number – A field where you can store manufacturers part numbers for an item. You may enter a manufacturer’s part number.
Pricing Date – Provided you have turned the Pricing Date option under the Tools menu you can enter a date the new price was entered.
TEMPLATE TAB
Condition – The third tab of this dialog is for Template information. You must link this item to a condition for it to become templatized. To do so, open the drop down menu (using the down arrow) next to the Condition field and select the Condition for the link.
CQty – Next, you will select a C-Quantity so the program will know how to calculate the condition this item is linked to.
Description, User Code, Unit Price, Order Formula, Order Unit, Waste %, Account Code, Phase Code, Part No. – From the Templated fields section you will select the fields that will be in change regarding this item, these are the fields you want templated. On many, many occasions you will only template the unit price field. In any case the fields selected here will allow you to create a new item(s) from an existing item, by changing only certain things (i.e. unit price, order unit, etc.).
Match Code – This field displays the Tildes, CQty/formula, Values range that have been selected and set up in the Match Code Builder.
– It displays the match code between the item in the item database and the template item in the template database. The two fields must match character for character in order for the match code to work.
– Finally, you will need to determine what Match code(s) will be assigned to this Template Item. The Match code(s) could be either Tilde codes or CQtys/formulas. These match codes represent what factors cause the template fields to change. For example, you may want to set up a stud Template. All studs are similar, but the cost may change based on the Width, Length or Type.
Production Rate – Only lights up when templatizing a Labor item.
Up and Down Arrows – Used to re-order the match codes.
Add Button – To add match codes into your Templates, press the Add button, which will open a Match Code Builder dialog. You will choose to create a match code from a Tilde code or a CQty\formula by pressing the corresponding radio button. See Match Code Build Below.
Edit Button – Used to edit existing Match codes as they appear in the dialog screen using the Match Code Builder in Add above.
Delete Button – Used to delete existing Match codes from the dialog screen.
MATCH CODE BUILDER
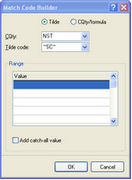
To add a Match Code to your template item, press the Add button, which will open the Match Code Builder dialog. You will start by choose to create a match code from a Tilde code or a CQty\formula by clicking the corresponding radio buttons
Tilde – If you choose to create your match code by using Tilde codes, you will select the appropriate C-Quantity for the Condition this item is being linked to. The list of possible CQty’s is opened using the drop down menu, with the down arrow next to the CQty field. Then you will select a Tilde code that will tell the program where in the condition to look for the values that will calculate the cost of this condition based on the inclusion of this templated item. Finally, you will insert a Value Range for the template to follow.
– For example, your stud price will change based on length. If you inserted values of eight feet and ten feet, your studs might cost $5 if they are under 10′, $7.50 if they are over 10′.
– You could also Add a catch-all value, which would allow you change the information for all items over a certain measurement.
CQty/formula – You can also create your match code by building a CQty/formula using the same dialog. To do so, click on the CQty/formula radio button. This will open a dialog that will allow you to create a custom match code. The condition is already filled in, as it is taken from the Item Properties dialog. But then, you will need to string together CQty’s and/or Tilde codes. You will see a list of categories of CQty’s/Tildes. (Press the + button to the left of each category to see its contents.) Click on each CQty/Tilde that you need, and press the Insert button after each one to insert it into the String field. Should you make a mistake and remove a code you really needed, you can press the Replace button to reinsert it into the string. If you need to create a formula out of these CQty/Tildes, insert the appropriate mathematical symbols after each CQty/Tilde. When you have completed your string, press the OK button, and your new CQty will be fed into the CQty field of the Match Code Builder. From